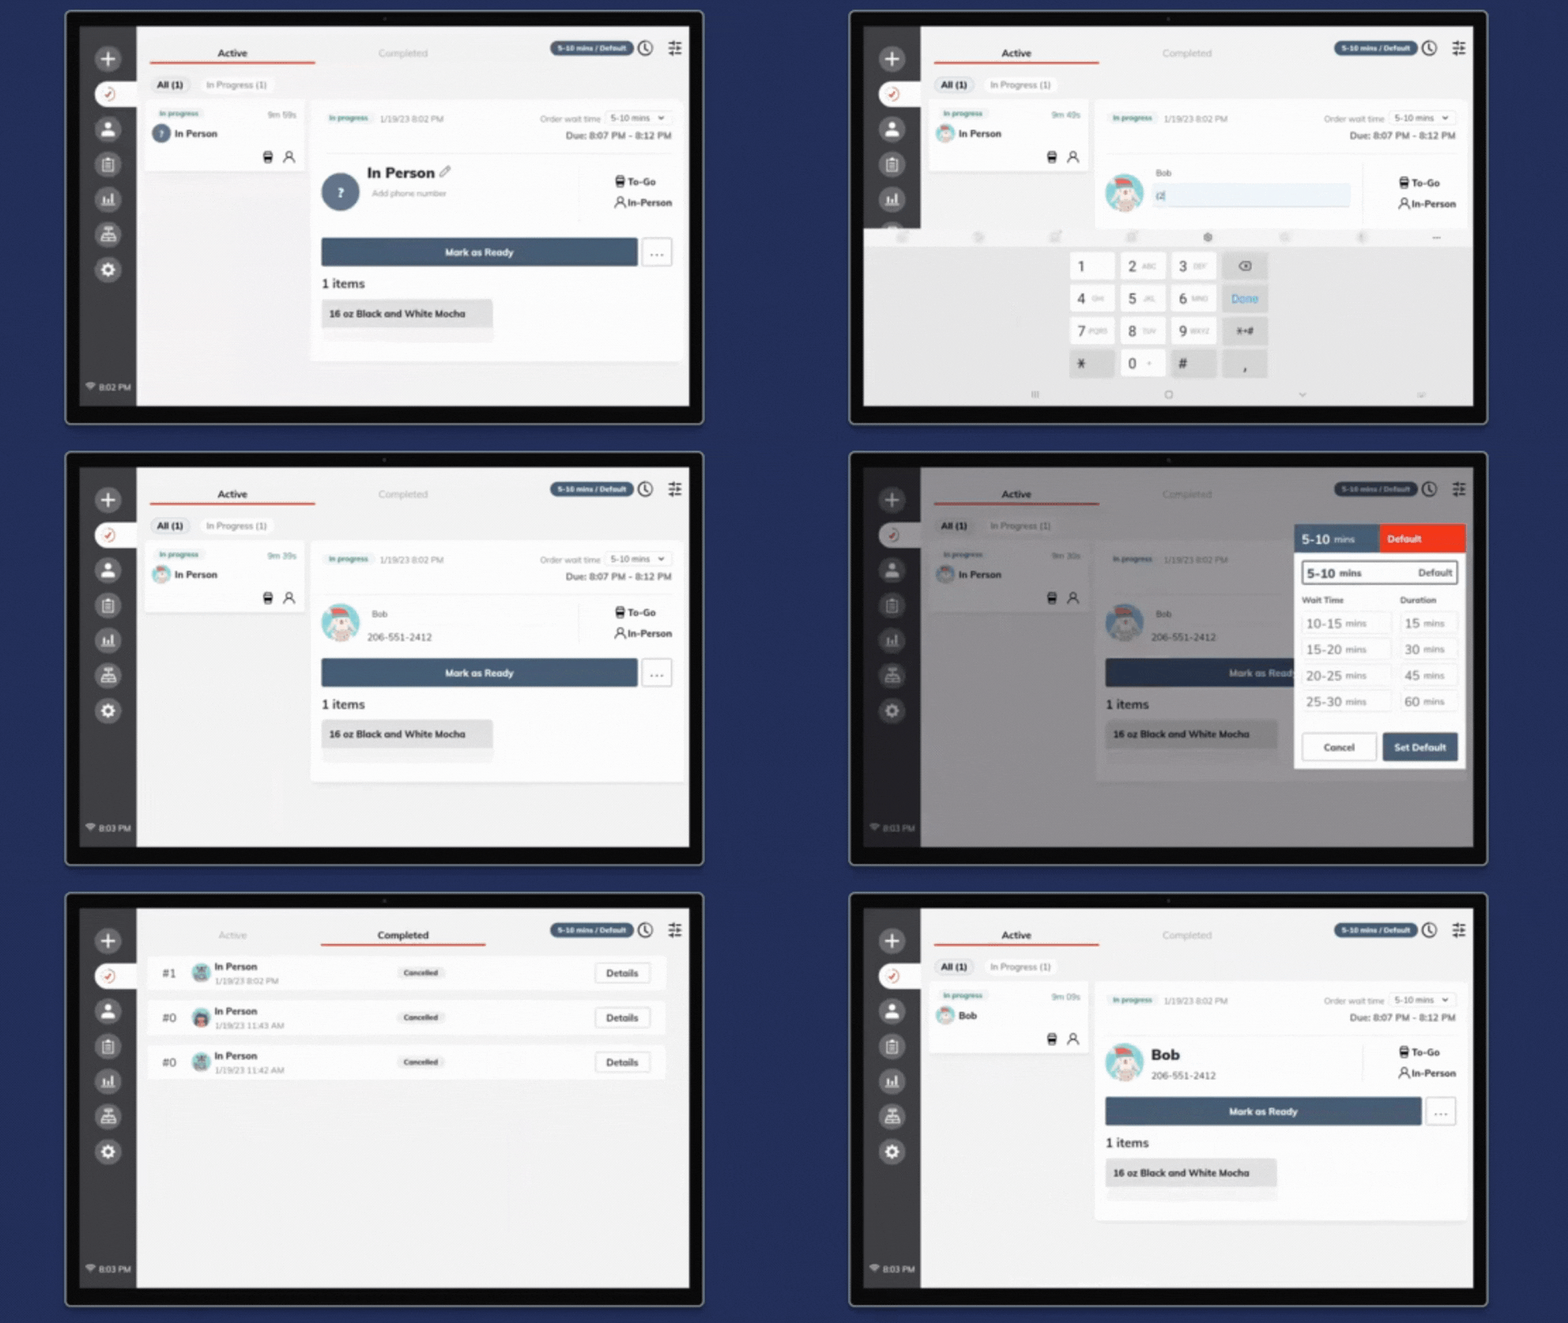
Order Status Screen
joe's Order Status Screen, active under the Check Mark tab from the navigation menu is where baristas can see, manage, and fulfill all queued orders both in-person and digital. The Order Status Screen automatically queues orders chronologically based on time sensitivity, and progress status of the order to keep your baristas organized and efficient.
IN THIS ARTICLE:

1 - How to Navigate the Status Screen
Looking at the Order Status Screen baristas will see three tabs across the top of the device: Active Tab, Pending Tab and Completed Tab.
- You have THREE Workflow Options that you can have your Order Status Screen
- Standard View: With Larger cards
- Grid Tile View: With slimmer and longer cards to view more orders on the screen
- Auto-Accept: Must be enabled on Merchant Manager which is available for both Grid and Standard Tile
- The Active Tab: Where baristas can view Order Cards for orders, both in-person and mobile orders. Here baristas can:
- Filter Active Orders by Status: across the top, baristas can toggle among All, In Progress, Scheduled, Curbside to better manage active orders
- Order Cards include the Customer Name, Phone number, items ordered, and pick up time
- Accept Mobile Orders and mark Items as Ready for In-person and
- Add a Phone Number or Name to an in-person customer's order if they forget to add a number on customer screen
Cancel Orders or Print Tickets by tapping the "..." 3 dots nexts to "Mark as Ready"

- Pending Tab: These are orders that the items have been completed but the order hasn't been marked as ready
- Items marked with Green Checkmarks ✅
- Items from Scheduled orders that are not at the moment ready to be started
- Completed Tab: Where baristas can view the last 100 orders, as well as:
- Refund Orders
- Reprint receipts
- Color Legend
Each Order Source has a color associated with

2 - Filters available on Status Screen
Order Status Screen filters, located in the top right hand corner allow your team to swiftly organize the type of orders you would like displayed on the Order Status Screen. For instance, enabling mobile orders on the device because it is used for a Kitchen Display System, but disabling orders for the Point of Sale tablet.
Filters av
- In Person Orders - Device Level: Only shows orders processed and accepted on this device ONLY on Order Status Screen.
- In Person Orders - Store Level: 100% of orders from any device paired to the Coffee Shop. Drive Thru, Mobile, Etc. (In - Person Orders - Device Level filter must be active)
- Mobile Orders - Device Level: Only Display Mobile Orders on the Order Status Screen
- Menu Category filter: Enable the categories from your menu that you would like to see on this device's order status screen. Any item in the disabled category will not be visible.
- On the very bottom of the Filter Tab you will see the Color Legend

3 - Adjusting Order Wait Time
Baristas can adjust the wait time for a single order using the Order Wait Time feature on the Customer Order Details Card. For example, a customer places a large order with both food and drinks for several people, and chooses to pick up in 5-10 minutes, but because of the type of order baristas know it will take 10-15 minutes.
To adjust the Order Wait Time:
- In the top right hand corner of the customer's Order Details Card, tap the current Order Wait Time to open the drop down menu of longer time periods
- Tap the desired Wait Time.
- A pop up window will appear, asking your baristas to confirm this longer wait time. Select Confirm to officially adjust time, which will trigger a notification to the customer about their Order Wait time change

4 - Adjusting Store Wait Time
When baristas are experiencing a rush and want to delay mobile orders placed for the duration for the rush, we recommend they adjust the Store Wait Time. As seen in the image below, customers in-app can see the Store Wait Time, setting proper expectation and a trustworthy pickup experience.
To adjust the Store Wait Time
- From the Order Status Screen, (check mark icon in the left hand menu bar), select the Store Wait Time drop down box in the top right hand corner
- Select your desired Wait Time, up to a 60 minute wait time
- Select your desired Duration, up to a 60 minute duration
- Save.
NOTE: After the duration has passed, your store wait time will return to the defaulted 5-10 minutes pickup window.
Example: If you set your Store Wait Time to 15 - 20 minutes for a duration of 60 minutes, the Store Wait Time f default back to 5-10 minutes once the 60 minute duration has passed

5 - Navigating the Completed Tab of the Order Status Screen
After orders are fullfilled, meaning baristas have tapped Complete Order, orders are automatically moved to the Completed tab of the Order Status Screen. The Completed tab lists the last 100 orders and baristas can tap into the order to view the details, as seen below.
From there baristas can:
- Refund Items by selecting the items and tapping Refund Items
- Reprint tickets by selecting the items and tapping Print Items
- Reprint a Receipt of the entire Order


